Have you ever considered the impact of visual design on the engagement of your wiki’s audience? From color schemes to layout structures, the choice of skins can significantly transform a plain text wiki into an eye-catching and interactive platform. With the right skin, you can capture your readers’ attention and create an immersive experience that keeps them coming back for more. So, how do you go about selecting the perfect skin for your wiki and customizing it to enhance user experience?
Selecting the Right Skin for Your Wiki
When choosing the right skin for your wiki, consider the overall theme and purpose of your wiki to ensure it aligns with your content and engages your audience effectively. The skin should reflect the style and tone of your content, providing a visually appealing and cohesive experience for your readers. A well-suited skin can enhance user experience and make your wiki more inviting and engaging.
Customizing Your Wiki’s Visual Elements
To create a visually distinct and engaging wiki, consider customizing your wiki’s visual elements to reflect the unique style and tone of your content, enhancing the overall user experience. Choose a color scheme that aligns with your brand and use custom fonts to make your wiki stand out. Utilize images and graphics that complement your content and create a cohesive look. By customizing these elements, you can make your wiki visually appealing and memorable.
Enhancing User Experience With Interactive Features
Consider incorporating interactive features such as quizzes, polls, and forums to engage your wiki’s users and foster a sense of community participation. Quizzes can test users’ knowledge, polls can gather opinions, and forums can facilitate discussions. These features not only make your wiki more interactive but also encourage users to actively contribute and engage with the content. By integrating these elements, you can enhance the overall user experience and create a more dynamic and engaging environment.
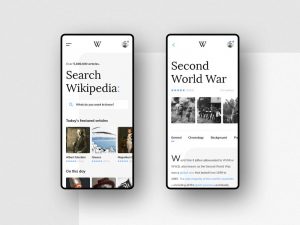
Optimizing Your Wiki for Mobile Responsiveness
Optimizing your wiki for mobile responsiveness is essential for ensuring a seamless user experience across various devices. To achieve this, prioritize a responsive design that adjusts to different screen sizes and orientations. Use flexible images and fluid layouts to prevent horizontal scrolling and ensure readability. Additionally, consider simplifying navigation and reducing unnecessary elements to improve loading times. Testing your mobile layout regularly will help identify and address any issues for a better user experience.